Getting Started With Leavins Inventory Manager
This tutorial will guide you through setup of Leavins Inventory Manager.
1. Download the installer
Download the installer from the main Leavins Inventory Manager site. Save the file to a location you can remember. I recommend saving it to your desktop.
2. Run the installer
Locate the installer you downloaded in the previous step. Double-click on it and hit 'next' or 'continue' at each screen (please read the End User License Agreement before clicking 'next' on the screen that it appears on). The installer automatically places program icons on your desktop and in your Start Menu.
3. Run the program
Go to your Desktop and double-click on the icon that says 'Leavins Inventory Manager.' The window for the program should appear in a few seconds; older systems will take longer to load the program.
4. Fill-out the 'first run' form
Before you start using Leavins Inventory Manager, you must first complete a short form.The form should look like this:
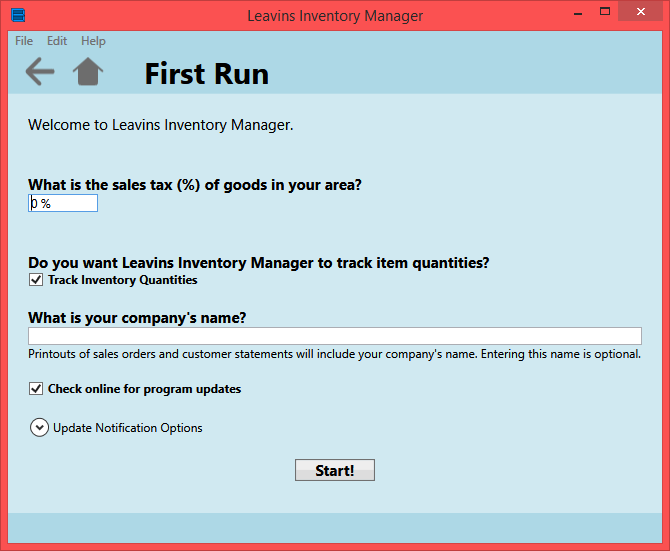
Here is a quick explanation of the options:
Sales Tax (%) - This is the per cent sales tax in your business's location. You can enter a percent (7%) or a decimal value (0.07) for the sales tax.
Track Inventory Quantities - If this box is checked, Leavins Inventory Manager will help you keep track of the in-stock quantity of each item that you store in the program. If you would like to track quantities yourself, you can safely disable this feature by clicking in the box when it is checked.
What is your company's name? - By default, this company name will be included in printouts of sales orders and customer statements. Putting your company's name is completely optional, but highly recommended.
Check online for program updates - Leavins Inventory Manager has built-in functionality that notifies you of product updates. If you need to enter proxy server information (if you've never heard the phrase 'proxy server', you shouldn't have to enter anything), you can do that by clicking on Network Options. You can also enter a product key from the Network Options section: it makes updating easier by giving you a link to your download page.
Click on the Start! button at the bottom of the form to confirm your settings.
5. Celebrate - you're finished!
If you need to change any of these options, you can do so at the Options page. When you are on the home page, click on the 'Change program options' link.